What’s GDAL?
GDAL is the Geospatial Data Abstraction Library, it’s a library to transform raster and vector data and it’s the Swiss Knife of GIS. Topography and bathymetry digital elevation models can easily be handled using GDAL.
I’m a linux guy. I actually hardly use graphical interfaces. I think that the client is the web, and that’s one of the reasons I created mapalomalia: the first web geological modeling platform. I have been seen a lot of people frustrated while using a graphical interface for processing hard things, in GIS, in CAD or in CAE, doing a heavy process in a graphical interface lets you wondering if it’s doing something, if it will ever finish, if you can do something else while executing the process. Also, you can’t repeat a process easily with the graphical interface. You have to remember each step and follow it exactly.
That’s where command line GDAL tools come in handy. If you have QGIS you have GDAL. Actually many of the processes QGIS uses come from GDAL libraries. If you don’t have QGIS you can install GDAL in Windows, MacOS X and in linux is on the package manager. You will need gdal-bin and python-gdal in Ubuntu to do this tutorial.
Check the Coordinate System of the Topography or Bathymetry File
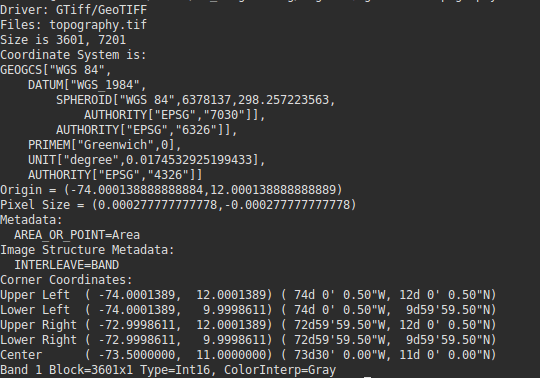
We’ll run gdalinfo in our file to show us all information about the file. This is the output of a typical Digital Elevation Model file:
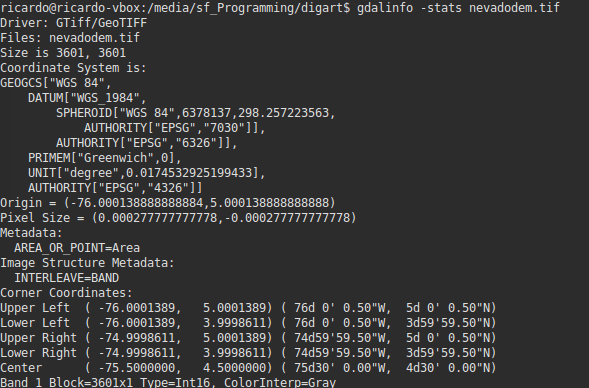
The first thing we see is the format. GeoTiff is the most common raster format, but GDAL supports several. Another thing is the geographical coordinate system. It’s represented as a OGC WKT format. In case there’s no coordinate system associated it will show the following:
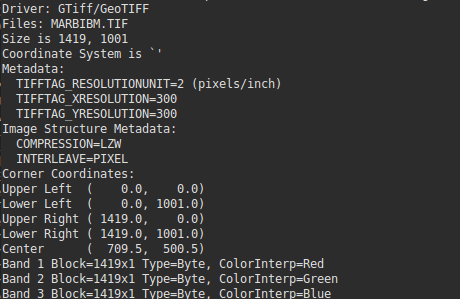
The file shows:
Coordinate System is `'
. To fix this file we could use the following command to set the given coordinate system:
gdal_translate -a_srs EPSG:XXXX infile.tif outfile.tif.
gdal_translate can also be used to change the format of the files, change the georeferenced bounds, etc:
gdal_translate -of GTiff infile.asc outfile.tif
Check the Correctness of a Topography or Bathymetry File
A task we might need to do is to check if the file is correct or at least not that filled with artifacts. First we use gdalinfo to check the altitudes in a file:
gdalinfo -stats file.tif
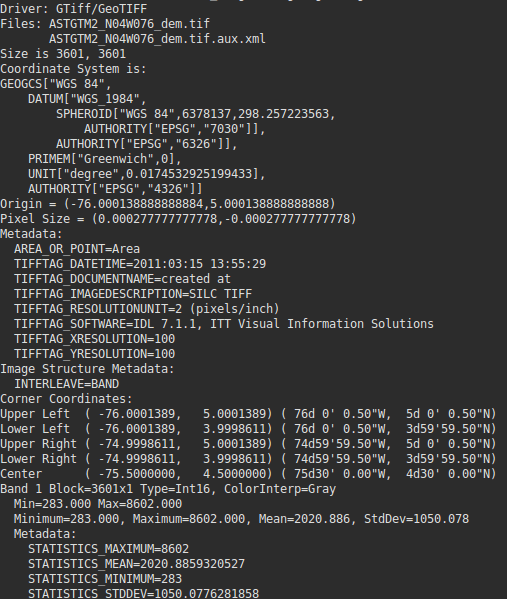
The first thing we notice is the Maximum=8602. The region is Nevado’s Park in Colombia and even when it has peaks above 5000 meters, it doesn’t have peaks at 8602m, it’s not the Himalayas.
We are using gdaldem to get more information about the file. gdaldem can also allow us to calculate hillshades, slopes, color reliefs, etc. Lets use a calculation of gdaldem called Terrain Ruggedness Index TRI. TRI calculates the mean difference between a central pixel and its surrounding cells.
gdaldem TRI input.tif tri.tif
We use again info with the -stats flag.
gdalinfo -stats tri.tif

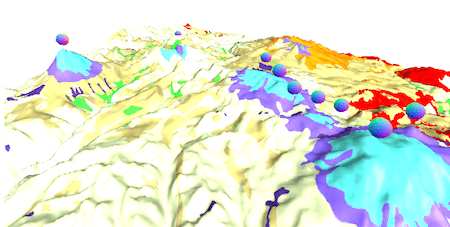
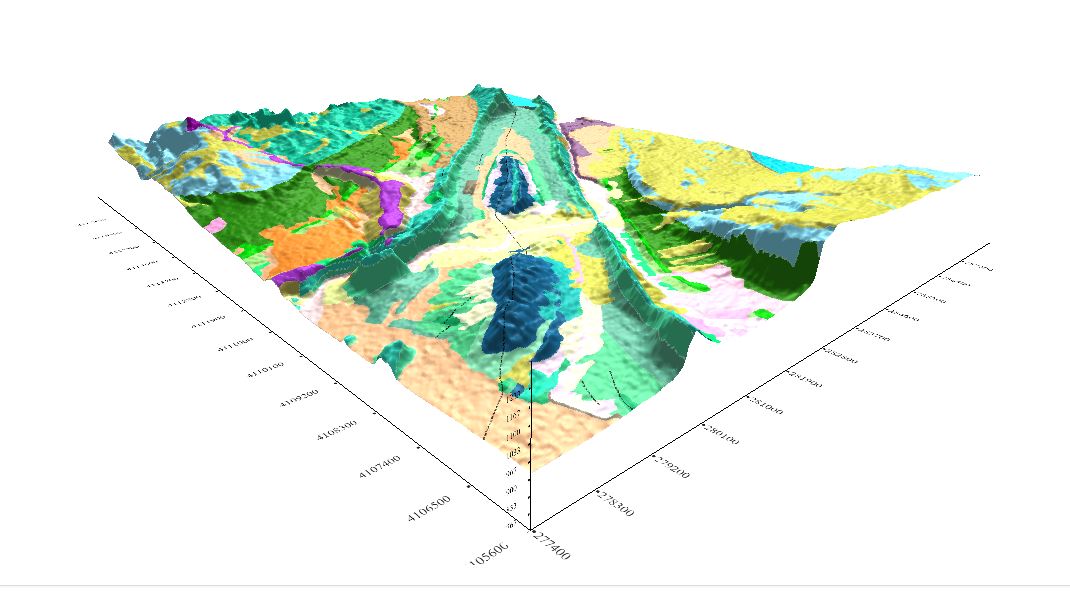
This shows a maximum value of 2117, which is pretty strange. However, the best way to see how bad a topography is, is in 3D. And it’s more obvious if you exaggerate it further.
Create a Digital Elevation Model with Topography and Bathymetry
The first thing we will do is download our topography and bathymetry files. We are going to model Sierra Nevada de Santa Marta using SRTM N10W074 and N11W074 for topography and ETOPO1 for Bathymetry. ETOPO1 has both Bathymetry and topography, but it has way less resolution than SRTM. You can still use the same trick if a file only contains Bathymetry and the rest is NoData. The first thing we do is merge both N10W074 and N11W074:
gdal_merge.py -o topography.tif N11W074.tif N10W074.hgt
The output topography file looks like this:
gdalinfo topography.tif
To be able to add the bathymetry data to the file we just created we need to align the file to these parameters. For that we use gdalwarp, which is a tool that allows us to warp files into other coordinate systems, and to change resolutions and windows. Using the previous output we can create a command that will align our bathymetry file with the topography file:
gdalwarp -te -74.0001389 9.9998611 -72.9998611 12.0001389 -tr 0.000277777777778 0.000277777777778 -r cubic etopo1.tif bathymetry.tif
The following parameters were used: -te to specify the window, -tr to specify the resolution and -r to specify the resampling method.
Finally we add both DEMs into one using gdal_calc.py.
gdal_calc.py -A bathymetry.tif -B topography.tif --outfile="joined_dem.tif" --calc="A*(A<0) + B*(B>=0)"
Here we calculated a new DEM where everything below the sea level will come from bathymetry.tif, while everything above the sea level will come from topography.tif.
The final result in mapalomalia looks like this:
Use Topography and Bathymetry in Mapalomalia
The GTiff Digital Elevation Models can be used in Mapalomalia to create geological models. Mapalomalia is the first web geological modeling platform and it allows you to create and share geological models. If you missed mapalomalia’s post, click here. This week mapalomalia will have its first free webinar about how to create your first Geological Model. We’ll go from georeferencing your model, uploading your Digital Elevation Model, creating your map and cross sections and finally making a block model to share on the web. Register here.
thanks for the article. Actually, if you have GRASS you have GDAL but if you have ArcGis too! Definitely the “Swiss knife of GIS”, you’re right 🙂
Hi Ricardo – nice article. I was doing similar for some SRTM data in Sulawesi and got the data converted to UTM, merged etc nicely with GDAL tools. How did you handle the bad data – your discussion seems to stop midstream – quote: “This shows a maximum value of 2117, which is pretty strange. However, the best way to see how bad a topography is, is in 3D. And it’s more obvious if you exaggerate it further.” I had similar spikes in the SRTM data and wrote a simple program to do a median filter though something canned is… Read more »
Hi Ian,
usually I use mdenoise [1] for treating SRTM scenes before using them in any other process. Mdenoise smoothes and filters patterns out of the satellite scene and can fill nodata areas as well. For filling voids there’s also gdal_fillnodata [2] available. The mdenoise tool is also available as a GRASS addon named r.denoise.
Cheers,
Frank
[1] http://personalpages.manchester.ac.uk/staff/neil.mitchell/mdenoise/
[2] http://www.gdal.org/gdal_fillnodata.html