
Since I’ve created the QGIS plugin qgis2leaf I was surprised how easy it is to create a plugin for QGIS. In this post I would like to show you how to build a basic buffer-plugin and give some tips for debugging and developing.
the plugin template
QGIS plugins are competely build in Python: the UI can be designed with QT designer using PyQT. The whole logic of the plugin needs to be written in Python as well. But lets be honest: It would be great if you would have a starting point. In QGIS there is a plugin for this called Plugin Builder:
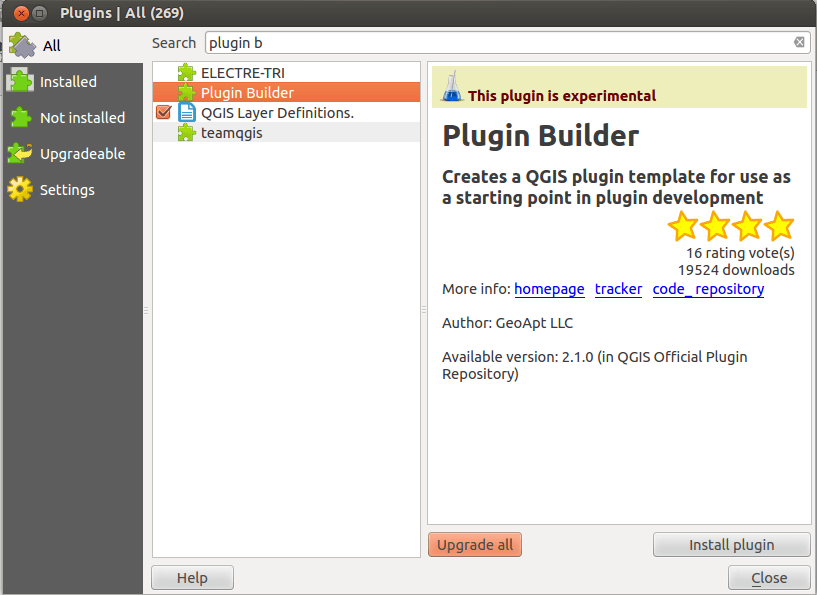
The plugin builder will create a template for your plugin. So provide the information like this:
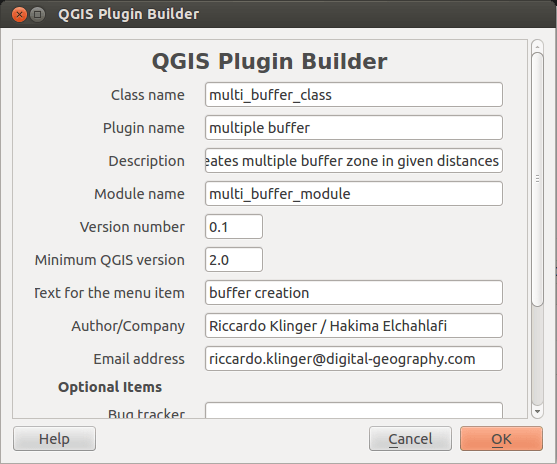
After pressing okay please choose the qgis plugin folder as the target folder (/home/{username}/.qgis2/python/plugins on Linux, C:\Users{username}.qgis\python\plugins on Windows )
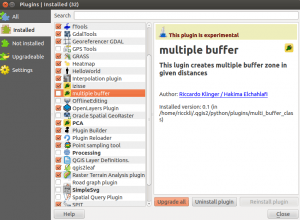
After running the plugin we have a separate folder in our qgis plugin folder:

But unfortunately we are not really finished as the plugin responses several other steps:
- Copy the entire directory containing your new plugin to the QGIS plugin directory (CHECK)
- Compile the resources file using pyrcc4 (simply run make if you have automake)
- open the terminal go to the plugin folder and type make in this folder on linux (how this works in Windows? comment!)
- if you dont have pyrcc4 isntalled, type
sudo apt-get install PyQt4-devel
(how this works in Windows? comment!)
- Test the generated sources using make test (or run tests from your IDE) (SKIP)
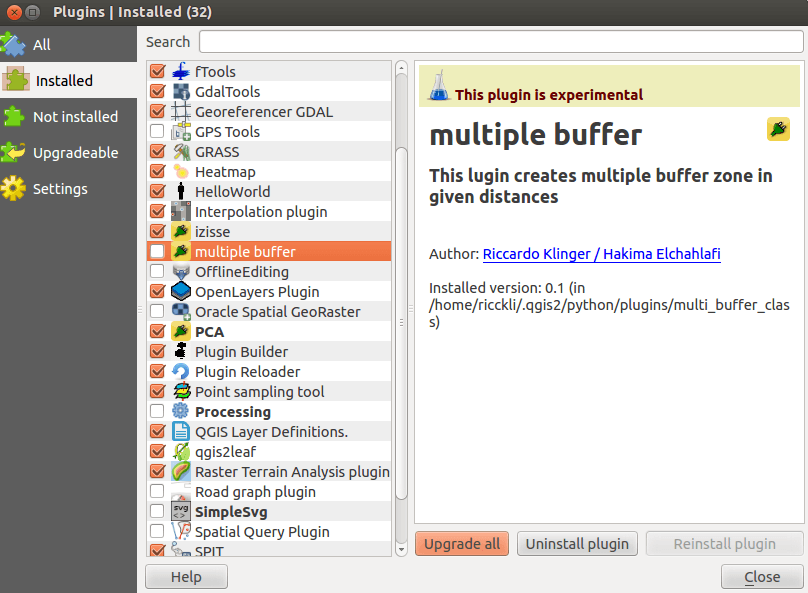
- Test the plugin by enabling it in the QGIS plugin manager
- It should be available in the plugin dialog in QGIS now (check to allow experimental plugins in the Settings tab)
-
plugin is available in the qgis plugin dialog.
- Customize it by editing the implementation file multi_buffer_module.py
- Create your own custom icon, replacing the default icon.png
- Modify your user interface by opening multi_buffer_class.ui in Qt Designer
- You can use the Makefile to compile your resource files when you make changes. This requires GNU make (gmake)
As the plugin says: customize it…
implementing logic in your qgis plugin
In our first example we would like to place some logic in the plugin: with the normal methods provided by QGIS it’s easy to create a buffer around a feature. But what, if you want several buffers that are equidistant from each other like 5 buffer zones in a distance of 10m? A classic example of batch processes and automation.
The whole logic will be put in the file multi_buffer_module.py. At the moment it is very basic as it is defined at the bottom of the file:
	def run(self):
		"""Run method that performs all the real work"""
		# show the dialog
		self.dlg.show()
		# Run the dialog event loop
		result = self.dlg.exec_()
		# See if OK was pressed
		if result:
			# Do something useful here - delete the line containing pass and
			# substitute with your code.
			pass
As you can see the first function is to show the dialog. For our purpose we need two input parameters: the number of buffer zones to be created and the distance one buffer should use. So let us open the dialog and create those input fields. Therefore we use QT4 designer and open the file multi_buffer_module_dialog_base.ui:
After customizing the UI we will care about the logic to get the parameters from the UI and use it in our plugin. To test the functionality it is very important to have the Plugin Reloader plugin installed so you don’t need to close and open QGIS after each change of the logic.
First of all we are interested in the values of the given parameters of the UI. This means we will change the above code like this:
	def run(self):
		"""Run method that performs all the real work"""
		# show the dialog
		self.dlg.show()
		# Run the dialog event loop
		result = self.dlg.exec_()
		# See if OK was pressed
		if result:
			distance = self.dlg.distance_buf.value()
			number = self.dlg.number_buf.value()
			print str(number) + ' buffers in ' + str(distance)
 			pass
As you can see: I am using the python console in QGIS to check whether my parameters are filled correctly:
So now we need to use this values for creating a buffer zones. So let’s check the bible of pyqgis called PyQGIS Developer Cookbook. First of all we need to have an idea how to use a selected feature of a layr as the input for a buffer creation. With a short look into this great resource we see that we can define a current active layer with this
layer = self.iface.activeLayer()
Compaing the code we have a structure called dlg wich holds all the dioalog elements and a structure called iface which refers to the current qgis environment as far as I have understand it.
As we don’t want to use the whole layer but just selected features we need to to define those as well with
selected = layer.selectedFeatures()
As we now have the features to create buffers around and the paramaters to use we can start. But we need to create a loop to create a buffer zone after another (according to the number of buffers) and we need to create a layer to store the data…
The targeting layer is defined by [sourceocde]result = QgsVectorLayer(“Polygon?crs=epsg:4326”, “result”, “memory”)[/sourcecode]
As you can see the layer name is given, the EPSG is fixed to EPSG:4326 (WGS 84) and the layer will be stored in memory, so you need to save it by hand afterwards. Now we want to have each layer name different so we will be able to distinguish the polygons after the creation. so we will change this line to
new_distance += distance
result = QgsVectorLayer("Polygon?crs=epsg:4326", "result" + str(new_distance), "memory")[/sorucecode]
Actually our code block looks like this at the moment:

	def run(self):
		"""Run method that performs all the real work"""
		# show the dialog
		self.dlg.show()
		# Run the dialog event loop
		result = self.dlg.exec_()
		# See if OK was pressed
		if result:
			# Do something useful here - delete the line containing pass and
			# substitute with your code.
			distance = self.dlg.distance_buf.value()
			new_distance = distance
			number = self.dlg.number_buf.value()
			layer = self.iface.activeLayer()
			selected = layer.selectedFeatures()
			print layer.name()
			for i in range(0,number):
				new_distance += distance
				result = QgsVectorLayer("Polygon?crs=epsg:4326", "result_" + str(new_distance), "memory")

			pass
[/sorucecode]
But like this it will crash at loading as the current python script doesn't know the <em>QgsVectorLayer</em> function. So scroll to the top of the file <em>multi_buffer_module.py</em> and import the library qgis.core by adding  where all the other imports are placed.
<h3>buffer zones and shape creation</h3>
Now comes the tricky part as all the feature creation things just work with a thing called dataProvider. So we need to get the data provider from our new result layer. Furthermore we don't know the number of features the user selects so we need an array of buffered features:
new_features = []
result_provider = result.dataProvider()
As I’ve mentioned we don’t know how many features were selected. So we will bring up a second loop:
for i in range(0,number):
				new_distance += distance
				result = QgsVectorLayer("Polygon?crs=epsg:4326", "result_" + str(new_distance), "memory")
				new_features = []
				result_provider = result.dataProvider()
				for feature in selected:
					XXX
Now what happens in the XXX section?! We will define the geometry and this definition is based on the geometry of the selected feature and a buffer around it. When we have this, we will add this to the array of buffer features:
feature.setGeometry(feature.geometry().buffer(new_distance,20))
new_features.append(feature)
As you may have noticed, the buffer functions needs two inputs. First the distance, second the “segments”. Segments define the number of segments a quarter circle have. So the higher this value your circles will get rounder but also computation will take longer.
In the end we will add our new features to the layer and add the layer to the map:
result_provider.addFeatures(new_features)
QgsMapLayerRegistry.instance().addMapLayer(result)
After some minor adjustments to the projection of the target files the whole function looks like this:
	def run(self):
		"""Run method that performs all the real work"""
		# show the dialog
		self.dlg.show()
		# Run the dialog event loop
		result = self.dlg.exec_()
		# See if OK was pressed
		if result:
			# Do something useful here - delete the line containing pass and
			# substitute with your code.
			distance = self.dlg.distance_buf.value()
			new_distance = 0
			number = self.dlg.number_buf.value()
			layer = self.iface.activeLayer()
			selected = layer.selectedFeatures()
			crs = layer.crs()
			print layer.name()
			for i in range(0,number):
				new_distance += distance
				result = QgsVectorLayer("Polygon?crs=" + str(crs.authid()), "result_" + str(new_distance), "memory")
				new_features = []
				result_provider = result.dataProvider()
				for feature in selected:
					feature.setGeometry(feature.geometry().buffer(new_distance,20))
					new_features.append(feature)
				result_provider.addFeatures(new_features)
				QgsMapLayerRegistry.instance().addMapLayer(result)
			pass
But one last remark: As we don’t convert your input files to a projected coordinate system at the beginning, make sure your layer is in a projected CRS at the beginning ;-).
You can download the whole multi_buffer.
Some further remark: If you want to extend your plugin and you don’t know what functions/methods are available for your object, just determine the name of the object and search on the API page of QGIS for it. So it’s “easy” to see that the EPSG code of a crs of a layer is available by the method .authid().
If you have any remarks, feel free to comment below!


[…] post How to build your own QGIS plugin appeared first on Digital […]
Hello,
I tried reproducing the plugin you demonstrated here, but I couldn’t. I feel my problem was in the final stage where all the logics have to be added to the UI. My UI prompts out well and all that. But once I copy and paste those codes on the editor under the run method, an error message shows up. Any suggestions?
I truly wanted to see what your plugin does.
My question is to the author. Would you be able to provide a breakdown of which file in the folder created by Plugin Builder serves which purpose? I am writing my own plugin (UI attached below). I am wondering where the codes should go? Where do I write the codes for accepting input, where does the output directory ‘File browse’ window code go, and where do I accept the user defined inputs. I understand that the logic will be added in the ‘result’ block inside the run() function, but the rest is unclear. Ex. Error – My UI is defined… Read more »
Got my solution, just after posting the above comment. Partial credit does go to this post itself.
I placed all my data variables’ definitions above the result statement in the run() function and all the logic after the result statement.
Thank you…
Compile the resources file using pyrcc4 in Windows:
cd C:Users{Username}.qgis2pythonplugins{YourPluginFolder}
pyrcc4 -o resources.py resources.qrc