Since a while I am programming with the JavaScript library D3.js … and … I am addicted to it! As I would like to present some tutorials on D3’s fantastic possibilities to create and design webmapping solutions … I think it would be good to give you a description on the things that I would identify as elementary.
Caution! This tutorial could be a little bit too detailled for you, when you are a skilled JavaScript programmer! I am sorry for that! But when you are a noob in JavaScript, as I was when I began to program with D3, it should help you to understand the structure of all the D3-examples than can be found … ähm … everywhere, in the meantime!
(This is the tutorial that I used when I began with D3)
Development Environment
Before you begin this tutorial, I recommend you to set up an HTML- & JavaScript developing environment, that feels comfortable to you. My basic setup consists of three elements (favored Software in brackets):
- Browser (Chromium)
- Editor (Sublime Text 2)
- HTML- & JavaScript Debug Console (Chromium – internal development window)
The 1st basic d3-command – d3.select()
D3.js enables you to immediatley access and (re-) define each element of an HTML-file without caring about DOM. D3 – Data Driven Documents … hmmm ….I write a lot of text what this means … well … let’s play a little bit with it and D3 will argue for itself 😉
Set up a new HTML-file ‘d3-basics.html‘.
<head></head>
<body>
<script>

</script>
</body>
Import d3.js to your new file
<script src="http://d3js.org/d3.v3.min.js"></script></span>

Now...use the <strong><em>1st basic d3-command</em></strong>...d3.select()
var body = d3.select("body");
var text = body.append("text");
Look into your html-debug-console...is there a text element in the body?
Now...add content & styling to your new html-element. Basically, you have 3 options to style an html-element in d3:
- .text("")
- .style("","")
- .attr("","")
Add content:
text.text("Hello!");
Add styling:
text.style("color","#f00");
Add attribution:
text.attr("id","text");
What did we define now? The text-element shows now a nice 'Hello!', is displayed in red and has the 'id' - 'text'. The id-definition has no effect so far, therefore we need an appropriate style within the head:
<style>
 #text{
 font-size:24;
 }
</style>
We can add the text-element with a shorter coding, but be carefull! Always have in mind which element is allocated by a variable. D3 allows you to cahin command until infinity (if you like to...you'll notice that in further examples 😉 ... but ... only the last appended element is allocated to the variable!
Check it out in the JavaScript-console:
console.log(body);
var body = d3.select("body").append("text");
console.log(body);
Look into the console...different objects, right?
So far...we added a new element to the body using d3 ... but ... we can also select and define existing html-elements
Basically, you can define and access html-elements on three ways:
- Name of an HTML element (e.g.: div, h1, etc.)
- ID
- CLASS
Let's see it in action ... add this to your body:
<h1>This is a tutorial!</h1>
<text id=sub1>sub1</text>
<text class=sub2>sub2</text>
Define (basic) html-elements directly:
var heading = d3.select("h1").style("color","#ff00ff");
Define (individual) html-elments by 'id':
var sub1 = d3.select("#sub1").style("color","#0f0");
Define (individual) html-elments by 'class':
var sub2 = d3.select(".sub2").style("color","#00f");
Doh...they are on the same line...simply append a break:
sub1.append("br");
sub2.append("br");
...easy, isn't it?
This is all cool but no real big advantage when you're used to set up html-elements manually. But what if I've got a huge set of data and want to have it quickly visualised? Now you'll see why it's called 'data driven' ... as I will show you now how to easily append and style a lot of html-elements with a minimum of code . This can be done by ...
...the 2nd basic d3-command - d3.selectAll()
First of all ... make some data:
var data = [];
for(var i=0;i<25;i++){
 data.push(i);
}
console.log(data);
Now ... add a div-element to the body and allocate it as 'container':
var container = d3.select("body").append("div").attr("id","#container");
Let's add one text-element per 'data'-element to the 'container' ... we begin by making an empty selection:
var data_text_selection = container.selectAll("text");
This is fundamentally for d3.selectAll() ... although there is NOTHING, we have to select all text elements!
We can now add our 'data' to the empty selection...enter it ... and append a text-elemtent for each 'data'-element
var data_text_elements = data_text_selection.data(data).enter().append("text");
Question: What is alocated to the variable 'data_text_elements'? ... look at it by using console.log()
Did you see ... it is the appropriate array of text elements that we've appended right before. That is why we can now redefine them all:
data_text_elements.text(function(content){return content}).append("br");
data_text_elements.style("fill", "#f00");
You can see ... this is exactly as for a single object!
Is it new for you how I define the '.text()' of each 'data_text_element'??? ... you can access the data that lies in behind by initialising a function ... when I want to test what i can access...I just write a console.log() into the function:
data_text_elements.text(function(content){console.log(content); return content}).append("br");
Notice! The variable 'content' is NOT FIXED ... call it however you want:
data_text_elements.text(function(little_princess_riding_a_pink_unicorn_762){console.log(little_princess_riding_a_pink_unicorn_762); return little_princess_riding_a_pink_unicorn_762}).append("br");
Advantages on SVG-Visualisations
So...these were the basics on the magic of d3 = the selections ... well, let's have a look at its advantages on svg visualisations, which we need for the funky mapping solutions we are going to make 😉
Use the previously filled container, and remove everything from it:
container.selectAll("text").remove();
Add a svg-elemtent to this 'container' ... this will be nothing else than another container for all svg-elements, that we display inside
var svgContainer = container.append("svg");
Again...did you notice the difference? Now we just use the container and .append() the svg-element ... previously, we wanted to add a set of elements and had to make a selection with .selectAll() --> var data_text_selection = container.selectAll("text"); ... let's go on
Define the size of the 'svg visualisation' area ... we will only see what is inside this dimension:
svgContainer.attr("width", 300).attr("height", 200);
Add a circle to the svgContainer and add the attribute and styling information directly:
var circle = svgContainer.append("circle")
 .attr("cx", 25)
 .attr("cy", 25)
 .attr("r", 20 )
 .style("fill", '#f00');
It is static isn't it, let's make it dynamic! This can be done by an additional fourth 'styling option':
- .on("",function)
- .text("")
- .style("","")
- .attr("","")
Add one to the circle (see documentation)
circle.on("mousedown",free_definable_function);
Click it! ... That gave a failure right...we have to define the function that we have assigned to the mousedown:
function free_definable_function(){
 console.log("Hello!")
}
Now use the moment and redefine the position of the circle and I wonder how it would look in green?
function free_definable_function(){
 circle.attr("cx",100).style("fill","#0f0");
}
Make in depending on the current mouse position:
function free_definable_function(){
 var mouseCoordX = (d3.mouse(this)[0]);
 circle.attr("cx",mouseCoordX+25).style("fill","#0f0");
}
It is a little bit fitfully, isn't it? ... d3 offers transitions that will make it smooth and cool looking:
function free_definable_function(){
 var mouseCoordX = (d3.mouse(this)[0]);
 circle.transition().ease('bounce').duration(1000).delay(250)
  .attr("cx",mouseCoordX+50).style("fill","#0f0");
}
Now after you click on the circle it: ... waits 250 ms, takes 1000 ms to arrive & moves bouncing --> See documentation for other values and individual functions
Finally, let's repeat this for a set of elements.
I wanne have three rectangles ... let's make some data for them:
var rectangleCoors = [75, 100, 125];
Now we use this array, to add three rectangles:
var rectangles = svgContainer.selectAll("rect").data(circleCoords).enter().append("rect");
 rectangles.attr("x", 50)
  .attr("y", function(d){return d})
  .attr("width", 25)
  .attr("height", 25)
  .style("fill","#00f");
... and make them dynamic
rectangles.on("mousedown",moveRectangle);
This time I write a little bit more code... to make the rectangles move back and forth:
var clicked = false;
function moveRectangle(){
 if(clicked==false){ var color='#f00'; clicked=true; var destination=1;}
 else{ var color='#00f'; clicked=false; var destination=-1;}
 rectangles.transition().ease("linear").duration(2000)
    .style("fill",color)
    .attr("x",function(d){return d+(25*destination)});
}
That's it for the basics. Your first d3 file 'd3-basics.html' should look like this! I hope you have understood the concept of d3's selections and how to add, select and define html-elements using d3.js.
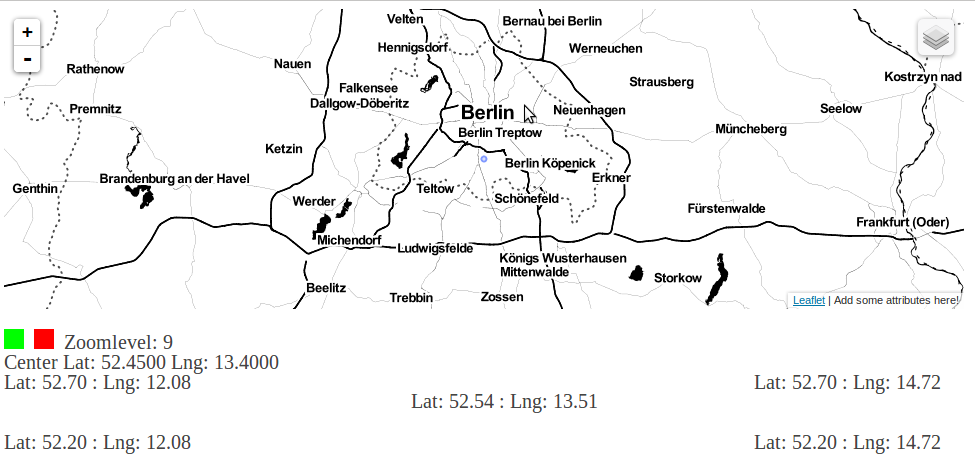
Sad but true ... as this was a basic tutorial ... there was no reference to geospatial processing ... I cannot finish this way ... ähm ... let's use our newly generated knowledge to impelement an individual zoomlevel selector, which we'll link with a leaflet map in another d3-tutorial!
What do we need basically?
- 'div' & 'svg' -container
- 2 clickable geometric svg-elements ( for zoom in & out)
- zoomlevel indication via text
Here is my very ugly example ... I know you can do it better!

[…] D3 Basics […]
[…] you remember how we’ve worked with D3 in the previous tutorials (Basics, Mapping Basics) … you should …you need that knowledge […]
Check this nice article on d3.js along with the video http://www.queryhome.com/49964/overview-about-d3-js-part1