In the recent years I often worked with ArcGIS Portal / Enterprise and fell in love with the idea of writing widgets which I can use in the Web AppBuilder for a custom web app. Unfortunately this is still only possible in your own ArcGIS Port Web AppBuilder and not in ArcGIS online. But maybe, this will change in the future. So please follow me, creating a custom widget to offer OpenStreetMap Routing as provided by ORS in ArcGIS Web Apps. I’ve used ORS as it is somehow not focussed on profit.
The prerequisites
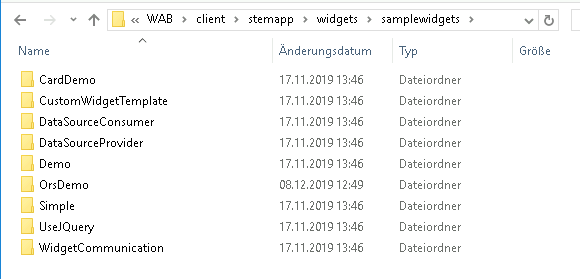
Let us start with a sample widget from the Esri R&D team in Beijing. This comes along with the Web AppBuilder (WAB) dev edition. You need to install and run this on a server if you want to follow my example. If you have everything in place, copy the “DEMO” widget from the the samplewidgets folder into the main widget folder “widgets”:
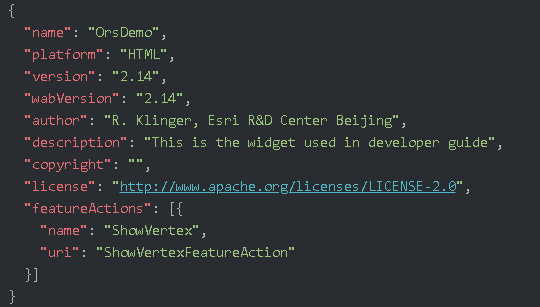
For this example, I’ve renamed not only the folder but also all the names “Demo” to fit well with my ORSdemo naming. Therefore you should check the manifest.json as well as the nls folders which are relevant for translation:
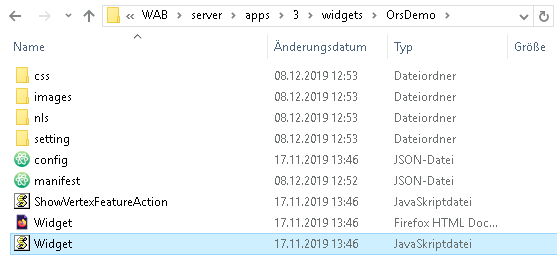
Once you have everything in place, create an app, add the ORS demo widget to it and save it. We will work with the widget in the app and recode it. This is more convenient as you don’t need to recreate an app for every unit test with a new version of the widget. You will find the widget in the folder ./server/apps/#NR/widgets
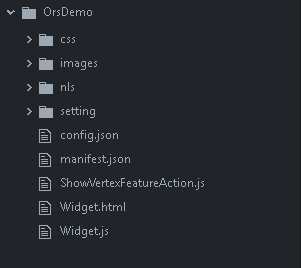
The folder/file structure for a widget
The main components are the:
- config.json – which is filled when we save the app in the WAB
- widget.js – which holds all JS code for the widget itself
- widget.html – the html element which shows up in the app
- setting/Setting.html – the setting dialog if you create a new app with this widget
- setting/Setting.js – the JS actions which we will use inside the setting dialog
You might have noticed the ShowVertexFeatureAction in our Demo widget. We will not cover this for this basic example!
Setting up the user dialog for routing
Any routing application demands a user to put in the start as well as the end location for the demanded route. This is somehow the two major ingredients besides others like travel mode, travel time, etc…
As described above, we will need to alter the widget.html file for this to allow a user to make some input and to trigger the route calculation with ORS:
<div>
  <div>
    <label for="StartPoint">Start Address:</label>
    <input type="text" name="StartPoint" placeholder="Berlin"
        data-dojo-type="dijit/form/TextBox" id="StartPoint" />
  </div>
  <br>
  <div>
    <label for="StopPoint">Stop Address:</label>
    <input type="text" name="StopPoint" placeholder="Paris"
        data-dojo-type="dijit/form/TextBox" id="StopPoint" />
  </div>
  <button id="RouteButton" type="button" />
</div>
Geocoding the Input with ORS
We will geocode the address line to work as an input for the ORS routing, so we create a function to geocode the given address. Pprior we will prepare the map to hold the coordinates for the start and stop as well as three graphic overlays. Therefore we will need to enhance the require statement at the head of the widget.js. We need different modules for the address points as well as route symbol and the interaction with the button/ textboxes:
define(['dojo/_base/declare',
'jimu/BaseWidget',
'dijit/_WidgetsInTemplateMixin',
'dijit/form/Button', //creating the dijit button
'dojo/on',  //handling events
'dojo/keys', //listen for 'ENTER' press
'dojo/parser', //constructing the button
'dijit/registry', // accessing the text inputs
'dojo/request/xhr', //making a CORS call / AJAX post
'esri/geometry/Point', //storing point geometry
'esri/symbols/SimpleMarkerSymbol', //show proper markers
'esri/symbols/SimpleLineSymbol', //show proper line
'esri/geometry/Polyline', //storing line geometry
'esri/graphic', //for constructing a graphic
'esri/layers/GraphicsLayer', //to store the graphic as a separate layer
'dojo/domReady!'],
function(declare, BaseWidget, _WidgetsInTemplateMixin, Button, on, keys, parser, registry, xhr,
Point, SimpleMarkerSymbol, SimpleLineSymbol, Polyline, Graphic, GraphicsLayer) {
 return declare([BaseWidget, _WidgetsInTemplateMixin], {
The goal is: when we insert an address string, the geocoded address should appear on the map as well as the final rout between A and B. Therefore we will use three graphic layers and an array to store the coordinates of A and B:
coordinates = [0,1];
glS = new GraphicsLayer({id:"START"});
glE = new GraphicsLayer({id:"END"});
route = new GraphicsLayer({id:"ROUTE"});
this.map.addLayer(glS);
this.map.addLayer(glE);
this.map.addLayer(route);
So we run two functions if a user typed in a start or stop address. The first function calls the ORS API and gets the geocoordinates (validateAdd). Once this is done, we will call a second function and clear the start/stop graphics layer and add a new point (addPoint):
var validateAdd = function(id){
  xhr("https://api.openrouteservice.org/geocode/search",{
    query: {
      api_key: apiKey,
      text: dojo.byId(id).value,
      ze: 1
    },
    handleAs: "json"
    }).then(function(data){
      try {
        dojo.byId(id).value = data["features"][0]["properties"]["label"];
        if (id == "StartPoint"){
          this.coordinates[0] = data["features"][0]["geometry"]["coordinates"];
          addPoint(data["features"][0]["geometry"]["coordinates"], "start");
        } else {
          this.coordinates[1] = data["features"][0]["geometry"]["coordinates"];
          addPoint(data["features"][0]["geometry"]["coordinates"], "end");
        }
      } catch (e) {
        alert("no address for "+ dojo.byId(id).value + " found!");
        button.setDisabled(true);
        if (id == "StartPoint"){
            this.coordinates[0] = 0;
          } else {
            this.coordinates[1] = 1;
          }
      }
    }, function(err){
      alert("calling the API failed: <br>" + err);
    })
}
The addPoint function creates the geometry as well as a defined marker symbol and adds the point to the graphics layer. As we change the input of a route finding we will clear corresponing layers as well:
var addPoint = function(coords, type){
  var p = new Point(coords[0], coords[1]);
  this.map.getLayer('ROUTE').clear();
  if (type == "start"){
    this.map.getLayer('START').clear();
    var s = new SimpleMarkerSymbol().setSize(10).setColor("green");
    var g = new Graphic(p, s);
    this.coordinates[0] = p;
    glS.add(g);
  } else {
    this.map.getLayer('END').clear();
    var s = new SimpleMarkerSymbol().setSize(10).setColor("red");
    var g = new Graphic(p, s);
    this.coordinates[1] = p;
    glE.add(g);
  }
  button = registry.byId("RouteButton");
  if (this.coordinates[0] == 0 || this.coordinates[1] == 1){
    button.setDisabled(true);
  } else {
    button.setDisabled(false);
  }
}
As we have the functions now, we need to ask ourself: when will those functions be called. Two anwsers:
- a user selects another input after entering one address
- a user presses enter to “fill in” an address
For both use cases we have a proper event handling:
startIn = registry.byId('StartPoint');
startIn.on('blur', function(){
  validateAdd('StartPoint');
})
startIn.on('keypress', function(event) {
  if (event.keyCode == keys.ENTER) {
    validateAdd('StartPoint');
  }
});
stopIn = registry.byId('StopPoint');
stopIn.on('blur', function(){
  validateAdd('StopPoint');
})
stopIn.on('keypress', function(event) {
  if (event.keyCode == keys.ENTER) {
    validateAdd('StopPoint');
  }
});
The Routing Functions
The button to run our route finding is created using some nice dijit magic as we will create it separately and connect it with the route finding function:
myButton = new Button({
  label: "Get Route!",
  disabled: true,
  onClick: function(){
    getRoute();
  }
}, "RouteButton").startup();
And the route finding function, is comparable to the validateAdd function but with a different API endpoint:
var getRoute = function(){
  xhr('https://api.openrouteservice.org/v2/directions/driving-car',{
    query: {
      api_key: apiKey,
      start: this.coordinates[0].x.toString() + ',' + this.coordinates[0].y.toString(),
      end: this.coordinates[1].x.toString() + ',' + this.coordinates[1].y.toString()
    },
    handleAs: 'json'
  }).then(function(data){
    this.map.getLayer('ROUTE').clear();
    var polyline = new Polyline();
    polyline.addPath(data['features'][0]['geometry']['coordinates']);
    var symbol = new SimpleLineSymbol().setWidth(2).setColor('blue');
    var polylineGraphic = new Graphic(polyline, symbol);
    route.add(polylineGraphic);
  })
}
Making it work with a custom ORS API key
You might have seen the variable apiKey. We need to read the key from the settings of the app as we will allow users of the widget to use their own API key. First we will alter the setting.html and initialize the API key input
<div>
  <label>${nls.apiKey}</label>
  <input data-dojo-attach-point="textNode" type="text"
    placeholder="your API code" data-dojo-type="dijit/form/TextBox">
</div>
As you can see, we’re also having some multi language support for the strings shown. So we will alter the basic nls file (setting/nls/strings.js) as well
define({
  root: ({
    apiKey: ""
  })
});
But of course, the user will type his/her API key in the setting for the widget and this should be used in the widget.js as well. Therefore, we save/revoke the provided API key via the setting.js
define([
  'dojo/_base/declare',
  'jimu/BaseWidgetSetting'
],
function(declare, BaseWidgetSetting) {

  return declare([BaseWidgetSetting], {
    baseClass: 'jimu-widget-demo-setting',

    postCreate: function(){
      //the config object is passed in
      this.setConfig(this.config);
    },

    setConfig: function(config){
      this.textNode.value = config.apiKey;
    },

    getConfig: function(){
      //WAB will get config object through this method
      return {
        apiKey: this.textNode.value
      };
    }
  });
});
Now, we access the provided API key in the widget.js at the top of the “startup” method:
apiKey = this.config.apiKey;
Some nice Style
Right now the user inputs looks a bit odd so I am adding some css to be in line with a standardized AGOL input. The style in the css/style.css looks like this:
.jimu-widget-demo div:first-child{
  color: green;
}
.jimu-widget-demo div:nth-of-type(2) {
  color: red;
}
.jimu-widget-demo input{
margin-left: 10px;
width: 200px;
line-height: 30px;
border-color:  #d9dde0;
padding: 1px 10px;
}
And this looks much better now in the app:
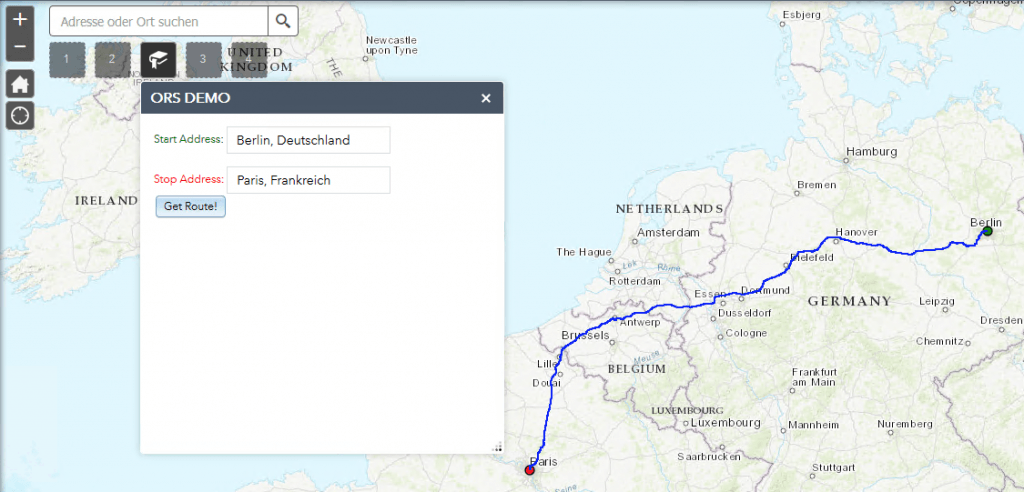
I apply the same input style to the setting/css/style.css and now the input looks much better as well:

Try the widget yourself (as long as the API credits are available) or download it from github.

[…] https://digital-geography.com/how-to-create-a-custom-web-appbuilder-widget-for-your-portal-with-ors/ […]
link https://h2857527.stratoserver.net/orsWidget/ isn’t working
thanks for this article: here an updated version of the code with some fixes
https://gist.github.com/DGuidi/d11b0dc317da7eaec8d038bd74d7673c